
Introduction to characters
- Introduction
- A note on character states
- Variation and the identification of macrofungi
- Collecting agarics
- Macrocharacters
- Habitat, ecology and distribution
- Equipment and techniques for viewing macrocharacters
- Microcharacters
- Contaminants
- Equipment and techniques for viewing microcharacters
- Mounting fresh or dried samples
- Preparing slides
- The range of microscopic preparations
- Stains and reagents
- Microscopy
- Further reading about macro- and microcharacters
Introduction
_Cyptotrama_asprata.jpg)
FunKey utilises a variety of characters that describe fungal fruit-bodies. Characters range from simple (such as the size and shape of the fruit-body) to complex (such as chemical reactions and microscopic features of the spores). Characters are either measurements (such as spore length) or multistate (with different character states, such as for spore print colour).
In the Lucid key window, characters and character states are listed in the Features Available panel. Help on each character state (choice) can be accessed by clicking on the icons in the bottom, right-hand corner of each character state thumbnail in the Features Available panel:

The left-hand icon displays the full image, while the right-hand icon opens the relevant Fact Sheet for more extensive information about that particular character state.
The left-hand icon displays the full image, while the right-hand icon opens the relevant Fact Sheet for more extensive information about that particular character state.
There is also a comprehensive Glossary of all terms used to describe characters and character states.
Characters are divided into macrocharacters
(those visible to the naked eye or with a hand lens) and
microcharacters (those visible only using a
compound microscope at high magnification).
The summary below deals briefly with all 115 characters used for identification in FunKey, and the ways in which different structures relate to one another. In
interpreting characters it is important to take into account
variation caused by developmental and environmental
factors.
Information is also provided on collecting
agarics, and on equipment and techniques, both for
macroscopic and microscopic examination,
including microscopy.
In the following sections, the character names as used in the
key are in bold, while other important terms are in bold italics. The order in
which characters are introduced is very similar to their native order in the key.
A note on character states
The key uses a simplified set of states for a given character, with the aim
of providing clear alternatives that are appropriate to identification at genus
level. For some characters, such as textures of the pileus or stipe surface, a
rich terminology is often used, describing subtle and complex variations. In the
key, these terms have been aggregated into relatively few states. For example,
terms for hairiness (such as pilose, villose, velvety, woolly, cottony,
pubescent, tomentose, hirsute, strigose, hispid and so on) cover variations in
hair length, stiffness and entanglement. For identification, we have found that
simply using two states for hairiness (finely hairy and coarsely hairy) is
sufficient; the slight extra power gained by having many states does not offset
the difficulty in distinguishing between subtly different terms (and hence the
likelihood of making an error in the identification).
Variation and the identification of macrofungi
Macrofungi are very variable in form due to developmental factors and the
influence of the environment. This variation must be recognised and taken into
account when identifying specimens.
Agaric fruit-bodies undergo considerable change during development, from
an initial, unexpanded (button) stage through maturity to eventual decay and
putrescence. Most are fleshy, and the fruit-bodies last for several days to
several weeks. A few genera are tougher in texture and longer-lived.
Macrocharacters should be assessed on mature fruit-bodies, unless otherwise
specified (the simplest guide as to what constitutes a mature structure is that
it will readily produce a dense spore print overnight). In the field, take the
opportunity to observe a range of developmental stages, so as to ensure that
mature material is collected. Where a partial veil is present, this will have
broken to expose the lamellae, usually leaving an annulus or ring-zone on the
stipe. Where a universal veil is present, this will have broken to leave a basal
volva and/or patches of tissue on the pileus. The pileus margin is often quite
incurved or inrolled in young fruit-bodies.
For Inky Caps (Coprinus, Coprinellus, Coprinopsis and
Parasola) the fruit-body undergoes a dramatic developmental change at
maturity. Enzymes autodigest the tissue of the pileus and lamellae, reducing it
to an inky mass in a matter of hours.
Fleshy fruit-bodies are very susceptible to drying out, even in situ;
many characters will be difficult to observe accurately on dry, withered
specimens. Colour of the pileus can change significantly on drying (especially
if the pileus is hygrophanous), and translucent striae will disappear.
Similarly, a viscid or glutinous surface will be lost as the fruit-body begins
to dry. As this happens the lamellae often become undulate when
viewed edge-on, rather than straight as in fresh material. Avoid collecting
waterlogged specimens, where adjacent lamellae often become stuck together.
While some species smell unpleasant even when fresh, a putrid odour is a
reasonable indicator of over-mature fruit-bodies.
When picking fruit-bodies, ensure that the base of the stipe (sometimes partially
buried) is included, along with any pseudorhiza or attachment to a sclerotium. Collect a range of
specimens from immature to mature, but avoid old and weathered or mouldy fruit-bodies. When
transporting specimens, make sure they do not dry out. Specimens can be wrapped in waxed paper
or placed directly in containers: margarine, yoghurt or ice-cream containers for larger specimens
or fishing tackle boxes, with compartments, for smaller specimens. Fungi can be stored in a refrigerator
for up to several days, but do not freeze. To make permanent collections, dry thoroughly in a food
dehydrator or drying cabinet, and store dried collections in snap-lock bags. Check specimens several
days after they have been sealed in the bag to ensure they are fully dried.
When using plastic containers to collect material in the field, putting a piece of
white paper in the bottom of the container and placing a severed pileus lamellae downwards can yield
a spore print by the time one has returned from the field. When making
spore prints in this way, use a container or section of a tackle box that is just larger than the
pileus, so that the pileus does not move around too much in transit, and stack containers so
the pileus is horizontal.
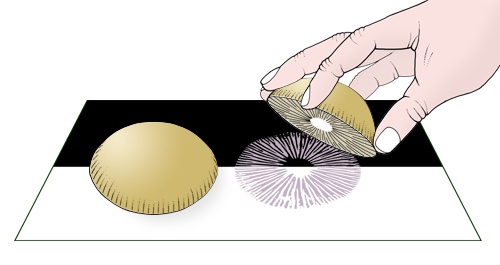
The colour of the spore print is a very important character for
identification; however, obtaining and then interpreting a spore print can be
frustrating. A spore print is achieved by cutting off the stipe at the apex, and
placing the pileus with the lamellae downwards on a piece of paper. Cover the pileus with a glass or container to prevent it drying out.
Making a spore print.
Use pure white paper so that you can distinguish white from pale cream or
pale pink prints. Placing the pileus mid-way on overlapping sheets of black and
white paper can also assist in observing white or very pale prints. Draw a line
around the pileus so you can see where the spore print is deposited. A dense
spore print is produced overnight, but within a couple of hours a faint print
may appear and give an indication of the colour. Set up the spore print as soon
as possible after collecting so that the fruit-bodies are fresh and a spore
print can obtained prior to commencing identification. Viewing the paper at an
angle will assist in confirming the presence of a print.
If a spore print cannot be obtained, indications of the spore print colour
can sometimes be found by examining the apex of the stipe, especially where it
is not strictly vertical, and the upper surface of the annulus, or even the
fibres of a ring zone (as in Cortinarius). Where one pileus sits over
another, a spore deposit can also be present on the lower pileus. In the field,
careful observation of vegetation and soil below the pileus will sometimes
reveal a spore deposit.
Spore print colour varies from white, pale cream or pink, through a range of browns, to black; on rare occasions, it is pale lilac or greenish. Spore print colour can be compared against colour charts such as Royal Botanic Gardens Edinburgh (1969), Rayner (1970) and Kornerup & Wanscher (1978) for discrimination of specific shades such as clay brown, rust brown or chocolate brown.
The exact spore print colour can be difficult to establish, particularly if the print is light, or if colour is being inferred from a spore deposit on the pileus, stipe or underlying vegetation. As with any character, if you have difficulty in selecting the most appropriate state, you should always choose more than one.
Pileus, lamellae and stipe
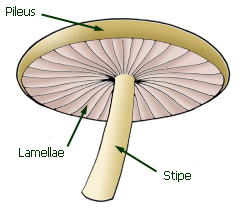
Parts of an agaric fruit-body.
An agaric fruit-body consists of a pileus (cap) beneath which hang the
lamellae (gills). In most agarics the pileus is supported by a stipe
(stem or stalk). The interior substance of the fruit-body (the flesh) is called
the context.
The colour of the pileus, lamellae and stipe is an important feature. Genera
with strong, bright colours (such as yellow, red, purple, blue or green) will key
out more readily than the many pale or brown genera. The pileus can be
concentrically zoned in more or less contrasting colours.
The dimensions of the pileus (diameter) and stipe (length and diameter)
are diagnostic for some genera, especially in combination with other characters.
Measure the stipe diameter at half the distance between base and apex.
In the brief descriptions that are accessible in the key
through the taxon fact sheets, pileus diameter is indicated as follows:
small (less than 25 mm), medium (25-75 mm), large (75-200 mm) and very large (greater than 200 mm).
The consistency of the pileus and stipe is typically fleshy, but it
varies from quite fragile to hard and woody.
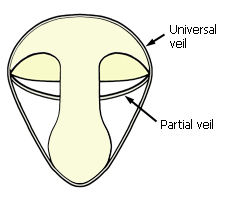
Veils on cross-section of young fruit-body.
The young fruit-body in some genera is covered initially by a universal
veil that ruptures to leave a basal volva, and often patches of
residual tissue on the pileus surface. A partial veil, when present,
initially joins the pileus edge to the stipe, covering the lamellae. The partial
veil can be membranous, or made up of fine fibres like cobweb (in which case it
is called a cortina).
As the fruit-body matures, the partial veil ruptures, sometimes leaving an annulus (ring) on the stipe, or merely a zone on the stipe surface.
The annulus can be moveable, have ridges or scales on the
undersurface, or it can be striate above.
The overall pileus shape and the shape of the centre of the
pileus varies, as does the surface texture of the pileus. Surface texture
variation is described in two ways. The character surface texture (cracks,
pits or wrinkles) describes modifications to the surface of the pileus
itself. The character pileus surface (hairs or scales) describes hairs (fine or
coarse), fibres, scales or patches of tissue that project above the pileus
surface; when these are absent the pileus is described as glabrous. Some surface
features, particularly squamules and patches of tissue, are often remnants of a
universal veil. In addition, the surface of the pileus can be viscid or
glutinous (different degrees of sliminess) or, alternatively, dry or
moist. The edge of the pileus can be striate (striped), either by the lamellae
showing through the pileus tissue (translucent-striate) or by grooves or
ridges on the surface or pleats at the pileus margin (grooved, ribbed or
pleated). Rarely, the pileus splits through the lamellae trama (the
interior flesh of the lamellae). As the pileus dries, it can change colour
significantly (hygrophanous). When young, the pileus margin
is usually inrolled or at least incurved, but in genera such as Mycena
the immature pileus edge is more or less parallel to the stipe. The pileus edge
can be smooth, or appendiculate, with scales or fibres hanging from the
edge (these are usually remnants of a partial veil). A potassium hydroxide (KOH)
solution applied to the pileus surface will sometimes cause a distinct colour
change.
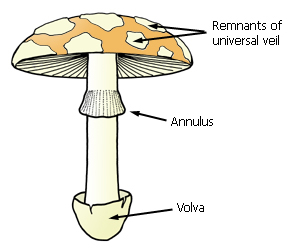
Mature fruit-body with veil remnants.
The lamellae attachment to the stipe ranges from free to deeply
decurrent. The thickness of lamellae varies, as does their spacing
(crowded together to distant). The edge colour of the lamellae can be the
same as or different to that of the lamellae faces. The edge texture can
be even or serrate (toothed), or the edge can have a gelatinous thread. The edge of lamellae
can be split lengthwise.
The faces of the lamellae can be mottled or uniformly coloured. In most
genera, short lamellae (lamellulae) are also present. Lamellae can be
regularly forked or they can have distinct anastomoses and cross-walls (intervenose) such that adjacent lamellae have frequent connections.
In genera such as Coprinus the mature lamellae autodigest and liquefy (deliquescent).
When pieces of lamellae of certain genera are mounted in KOH, coloured pigment can be seen to diffuse into the surrounding fluid.
Stipe position can vary from central to lateral, or a stipe can be
lacking entirely (with the pileus attached directly to the substrate). The
overall stipe shape varies, as does the stipe base shape. The
stipe surface texture can be smooth to squamulose or pruinose, and it can be
viscid or not. A pseudorhiza (rooting base) or sclerotium
(sterile tuber-like structure) can be present at the base. The stipe can arise
directly from substrates such as fallen leaves (insititious) without any
basal mycelium or, alternatively, the basal tomentum can be white or
variously coloured. Rhizomorphs are thin, ropy aggregations of hyphae
arising at the stipe base; they are often black and shiny and resemble horse
hair. Sterile criniform stipes, topped by a tiny aborted pileus, are
rarely produced.
In some genera the surface of the pileus or stipe, or their context can
change colour on cutting or bruising. Latex (milky juice) can ooze
from cuts to the fruit-body. Fruit-bodies of a few genera are luminous.
The odour of some agarics is highly distinctive, with smells ranging
from quite pleasant to very offensive! Odour is included in the key, but to take
account of the varying olfactory ability of different people, all genera are
coded as having no distinctive odour, in addition to any distinctive odours that
can be detected by those with sensitive noses.
Agarics grow on a range of substrates, and the distinction between
wood, litter, dung and soil is an important one. The substrate is sometimes
difficult to determine, especially with species that grow on buried wood, but
FunKey accommodates misinterpretations of this character. The growth habit
of fruit-bodies varies from solitary to densely clustered. Associated plants
can assist identification, because some fungi grow preferentially in lawns,
others only with exotic trees. A limited range of genera grow in urban
habitats or in gardens.
There are two main modes of nutrition. Saprotrophs gain
nutrition from the breakdown of organic substrates, and grow on these substrates
(wood, dung, litter) or on the ground. Mycorrhizal agarics form a
mutualistic relationship with plants, and always grow on the ground. A few
agarics (such as Armillaria) are parasitic on living
plants. However, agarics growing directly on wood are mostly saprotrophs, while
those on the ground can be saprotrophs or mycorrhizal. The nutritional mode
tends to be uniform within a genus but is not directly discernable from the
fruit-body, and thus this characteristic is not used in the key.
Distribution is given by States and
Territories. For this purpose, the Australian Capital Territory is included in
New South Wales.
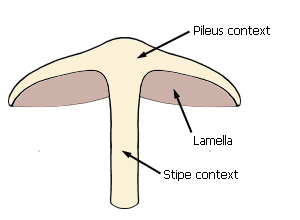
Median longitudinal section of fruit-body showing lamellae
attachment and contexts.
A hand lens (or dissecting microscope) is essential in order to observe
certain macrocharacters. We have distinguished states of characters, such as
pileus and stipe surface and lamellae edge colour and texture, based on what can
be seen at a magnification of ×5 with a hand lens. Of course, more detail can be
observed at higher magnifications, but such detail should not be used as the
sole basis for choosing between character states. It is possible to view many
macrocharacters of the fruit-body in situ. A small mirror (such as a
long-handled dentist's mirror) can be useful to inspect the lamellae.
A median longitudinal section of the fruit-body (slice it lengthwise in half
through the stipe) assists determination of lamellae attachment, and is also
necessary to see colour changes on exposing the stipe and pileus context.
Microcharacters are of great importance in identifying fungi, since many
genera are similar macroscopically, but have distinctive spores and other
microscopic characters. Microscopic characters must be observed under high
magnification using a compound microscope (see microscopy).
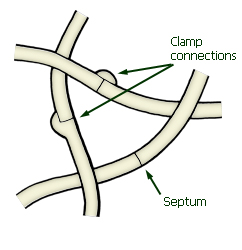
Hyphae showing clamp connections
and septa
Agaric fruit-bodies are predominantly made up of hyphae, which
are typically long, thin, cylindrical structures with septa
(cross-walls). Compartments of hyphae or any modifications of hyphae (such as
globose structures) are not referred to as cells, but as elements.
The hymenium (spore-bearing layer) covers the
outer surface of each face of the lamella, and sometimes also the edge. Spores
are produced from specialized elements of the hymenium called basidia.
Each spore arises from a small curved projection at the apex of the
basidium, called a sterigma (plural sterigmata), to which it is
attached by a minute projection, the hilar appendage (apiculus).
Immature basidia are called basidioles: they are similar in shape
and size to basidia but lack sterigmata.
Spores are three-dimensional objects. The width (distance between sides in
side view) and breadth (distance between sides in face view) can differ. In
side view (profile) the hilar appendage is visible at the base to one
side; in face view (front or frontal view) the hilar appendage is
visible at the centre of one end of the spore. Thus, in the diagram below,
spores a and c are in side view, and spore b is in face
view.
In end view (polar view) the spore is viewed with the
long axis pointing directly at the observer.
In side view, the side facing the
long axis of the basidium when the spore is attached to the sterigma (which is
the side the hilar appendage is on) is the adaxial (dorsal) side,
the opposite is the abaxial (ventral) side.

Basidium and spore terminology. A - basidium with spores. B -
spore in situ on sterigma, showing terminology for sides and
ends. C - spores in situ, a and c in side view, b and d
(partially obscured) in face view. D - spores in situ on the apex
of the basidium showing the spores in end view.
Spores are minute, mostly between 5 and 20 micrometres long, and vary in
length and width. Spores also vary considerably in shape, both in
terms of the overall ratio of length to width, and the general outline
(whether rounded, angular, pear-shaped and so on) in side or end view. Spores
are rarely medially constricted. The colour of spores under the
microscope ranges from hyaline (colourless) through shades of brown to very dark
(in a manner similar to the spore print, but not always predictable from the
spore print colour). The reaction of spores in Melzer's Reagent is highly
characteristic of each genus.
Spore surface ornamentation can be absent (i.e. the spores are smooth),
or spores can have a warty, spiny or ridged surface, with the ornamentation
height being variable between species and genera. Ornamented spores
sometimes have a bare area (plage), or they can be partially or
completely covered by a thin outer membrane (perispore). The spore wall
can be thickened. The apex sometimes has a germ pore, and then is
often flattened. Spores in agarics are usually unicellular; only rarely are they
septate.
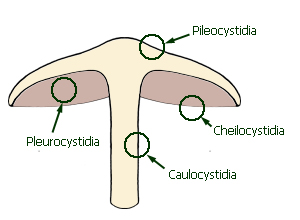
Positions of the principal
types of cystidia
Cystidia are differentiated structures that, when present, are often
important for microscopic identification. They are sterile, and occur in the
hymenium on the edge or face of lamellae, or at the terminal ends of hyphae on
the pileus or stipe surface. Cystidia are named according to their position:
pleurocystidia occur on the face of the lamellae, cheilocystidia on
the edge of the lamellae, pileocystidia on the surface of the pileus and
caulocystidia on the surface of the stipe. Each type of cystidium varies
in overall shape, apex shape and
branching.
Special types of cystidia occurring in the hymenium of some genera include
chrysocystidia (with yellow contents in KOH) and gloeosphex cystidia
(with an hour-glass-shaped tip covered by a droplet). Hymenial cystidia can have
thick walls or be capped with crystalline material.
On each lamella, the hymenium (spore-bearing layer) comprises mature and
immature basidia, sometimes intermingled with sterile elements (cystidia, see
above). The length and width of basidia can vary between genera.
Occasionally, the size of basidia is markedly polymorphic, with two or
more size classes present within a hymenium. The number of spores
produced on each basidium is usually four, but sometimes there are regularly
only one or two and, on rare occasions, as many as eight spores per basidium.
In cross-section the outer layer of the pileus (the pileipellis
or cuticle) can consist of cylindrical hyphae that are parallel to the
surface (a cutis), or more or less vertical in a palisade (hymeniderm), or in
some other arrangement. The hyphae of the pileipellis can be gelatinised
or they can be branched or have intracellular or encrusting pigment.
The terminal elements of the pileipellis vary in shape and
surface features. The layer immediately beneath the pileipellis (the
hypodermium) can consist of hyphae whose shape is similar to or
different from those of the pileipellis, and the hyphae can be gelatinised.
The trama (flesh) of the pileus is usually a hyaline colour in KOH.
The tramal hyphae can be uniform in appearance (monomitic), or comprise two
different kinds (dimitic); these are described under the hyphal system.
Where the hyphal system is dimitic (comprising generative and skeletal hyphae),
the skeletal hyphae shape is diagnostic. The generative hyphae
diameter can vary, and the presence of thick-walled hyphae in the
trama is also diagnostic. Distinctive, smooth or ornamented swollen
elements can occasionally occur in the pileal trama.
The lamellar trama (the thin layer of flesh between the
two faces) is usually made up of descending, more or less parallel hyphae in a
pattern that is said to be regular. Alternatively, the hyphae can be
irregular or slanted on each side towards or away from the edge. On rare
occasions the direction of the trama is radiate rather than descending.
The hyphae of the lamellar trama are sometimes dextrinoid (reddish brown
in Melzer's Reagent). Occasionally, there are protruding bundles of hyphae on the faces of the
lamellae that form hyphal pegs.
The trama (interior flesh) of the stipe usually consists of
parallel hyphae of similar diameter; however, there is sometimes a mixture of
broader and narrower hyphae (sarcodimitic).
Clamp connections are specialised structures sometimes formed at the
septum (wall) between adjacent compartments of hyphae, and at the base of
basidia and cystidia.
When studying microscopic characters, avoid recording details from spores and
other structures of contaminating microfungi. Fruit-bodies usually have at least
some pollen grains or spores of other species adhering to their surface. In
addition, a wide range of microfungi grow on or in the fruit-bodies of
macrofungi. Contaminating spores can sometimes be present in large quantities,
in which case there will usually be some sign of infection at the macroscopic
level, such as powdery or furry patches. The mould Sepedonium infects
Boletaceae such as Phylloporus, starting as white cottony patches that
eventually engulf the whole fruit-body. Old agaric fruit-bodies are often hosts
to pin moulds, such as Spinellus, which form a fluffy covering, while
small agarics can support the gregarious, yellow perithecia of Barya.
When using FunKey with macroscopic characters only, you will often find that
an identification cannot discriminate between a number of genera, and
microscopic characters are needed to continue the identification to a single
genus.
Microscopic characters require more preparation and work than macroscopic
characters, but they are essential for properly identifying some genera, and they are
always useful for confirming identifications. If you are able to invest in a
compound microscope and some simple equipment and stains, you will find that
accurate identification of fungi becomes much more achievable. Most of the
techniques described below are quite straightforward, and can be readily
mastered with a little practice.
Essential Equipment
- compound microscope with ×40 objective, and preferably also with ×100 oil immersion objective and immersion oil
- eyepiece micrometer (scale for measuring objects)
- fine forceps
- razor blades
- microscope slides and cover slips
- tissue or absorbent paper
- solutions and stains
Optional Equipment
- dissecting microscope
- fine paintbrush
- mounted needles
Fresh material can be examined directly in water or in Stains and reagents,
either as a Squash preparation or after cutting Sections.
Dried material needs to be rehydrated before it can be observed under the
microscope. Some material can be rehydrated simply by placing directly in water,
but dried fungal tissue often does not rehydrate well in this way. A weak
solution of potassium hydroxide (KOH) usually assists rehydration, and also
helps to free up hyphae that have become stuck together on drying. Well-dried
material, particularly thin sections, will rehydrate within minutes when
placed in several drops of KOH on a slide. Otherwise, place small chunks of
tissue in KOH solution in small wells or vials (covered so as to not dry out)
for several hours or overnight as necessary. Once rehydrated, sections can be
cut and the material viewed directly in KOH, or transferred to other solutions.
Potassium hydroxide is also useful for examining fresh tissue of fungi with
tough context such as those in the Polyporales.
Remove fragments or sections of tissue from the sample with fine forceps or a
blade, place in a drop of mounting medium on a slide, and gently add a cover
slip. Small pieces of tissue are better than large chunks. For thin sections,
the mounting medium will spread under the cover slip. For larger tissue
fragments which are to be observed from a squash preparation, squash the sample by pressing gently at
this stage.

Mounting tissues for microscopic work
Place the tissue fragment in a small drop of mounting medium and then add cover
slip
Remove excess mounting medium by placing the slide and cover slip face down
on absorbent paper and pressing very gently. Be careful not to get mounting
medium on the centre of the cover slip. Alternatively, hold the slide more at
less at right angles to the bench surface and then tap the long edge of the
slide on to absorbent paper lying flat. This action will often move the cover
slip to the edge. The slide can be held against the paper and excess mounting
medium will bleed onto the paper. Push the cover slip back to the centre of the
slide with forceps or a needle. If large air spaces form beneath the cover slip,
too much mounting medium has been removed, and the piece of tissue is probably
too thick. Specimens from sandy soils often have sand grains in the tissue,
which can be larger than the thickness of the tissue being examined, in which
case the cover slip will rock on the sand grain. Remove sand grains by dragging
them away with forceps.
A full examination of all significant microcharacters includes inspection of
tissue from the lamellar edge (for cheilocystidia), a cross-section of a lamella
(for pleurocystidia and the orientation and staining of the lamellae trama), a
radial cross-section of the pileus (for pileipellis, hypoderm and pileus trama
structure) and a peel of the stipe surface (for caulocystidia). In addition,
some tissue arrangements can only be confirmed by a cross-section of the stipe
(for sarcodimitic tissue) and a longitudinal section of a lamella (for radial
lamellar trama). Nevertheless, many diagnostic characters can be seen from just
a few simple Squash preparations or Peels and scalps rather than
cutting Sections.
Sections must be as thin as possible. It is quite possible to cut thin
sections by hand, but some practice is required. The tissue structure of fresh
material is often clearer than in rehydrated material, but fresh material can be
quite watery and difficult to cut without becoming compressed. With dried
material, it is often easier to cut sections first and then rehydrate.
A dissecting microscope can be used to view tissue that is being cut for
sections. Use new, sharp razor blades. Double sided blades can be snapped in
two. Take care when cutting sections not to cut your fingers!
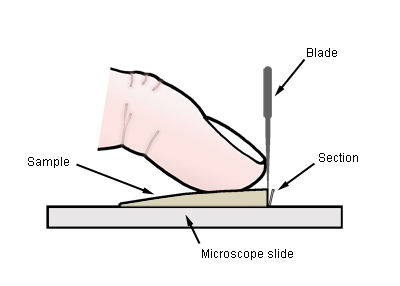
Cutting thin sections using finger as a brace for the blade.
When preparing a cross-section of the lamella, cut out a piece of a
single lamella that includes most of the distance between top (where attached to
the pileus) and edge, and is about 1 to 2 cm long. Place the piece flat on a
slide. If the lamella is deep (longer than 2 cm from top to edge), cut the piece
in half parallel to the edge, and discard the half that does not include the
edge. With a razor blade in one hand, place the first finger of your other hand
firmly on the piece of the lamella, arching the finger slightly. The lamella
piece should be oriented so that your finger is at right angles to the axis of
the lamella which runs from top to edge. Place the blade against your finger at
right angles to the tip of your finger. Cut straight down with the blade. You
will need to experiment to get the right balance between downward pressure and a
sideways, sawing motion. Roll your fingertip back and forth slightly to adjust
the thickness of the next section that will be cut. If the direction of the cut
is not quite parallel to the fresh edge of the previous cut, the section will be
thicker at one end than the other, and thus just the right thickness in the
middle!
The lamella cross-section will be like a narrow slice of pizza, triangular
with a very small angle at the apex. The apex of the triangle is at the lamella
edge, with a row of basidia along each of the two long sides. Between the rows
of basidia is the lamellar trama, in which the orientation of the hyphae should
be clearly visible. If the section is too thick, it is likely to sit so that you
look at the hymenium in top view (with the apices of numerous basidia and
basidioles visible) rather than the cross-section.
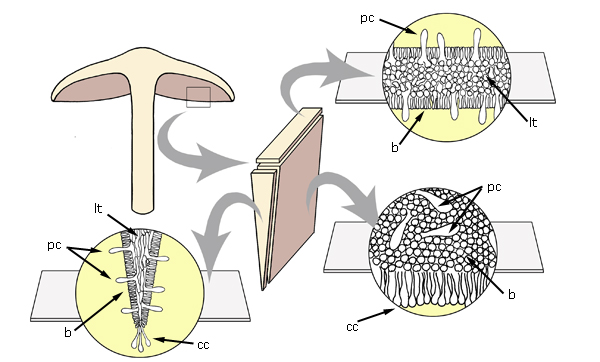
Views and sections of the
lamella. lt - lamellar trama, pc - pleurocystidia, cc - cheilocystidia, b -
basidia.
To prepare a radial cross-section of the lamella, cut out a piece of a single
lamella as for the cross-section, but make the first cut in the middle parallel
to the edge of the lamella, and then take sections from the fresh edge, cutting
parallel to the edge.
When sectioning the pileus, a radial cross-section will best show the
pileipellis structure and the structures of the underlying hypoderm (if present)
and trama. Start with a block of tissue that includes the pileus surface and
some underlying context. This block can be removed from a medial longitudinal
section of the whole fruit-body, by cutting from the exposed upper pileus
context. Alternatively, when the pileus is convex, start with a scalp section.
The block or scalp should come from about half way between the edge and the
centre of the pileus. Be careful to keep track of the orientation of the scalp
or block so that you know which is the upper surface and which is the radial
axis. Making the scalp or block rectangular in top view with the longest side
parallel to the radial axis can help, as can making it relatively thin. To cut
the cross-section, use the same technique as for sectioning lamellae, initially
placing your finger on the pileus tissue so that the razor blade cuts along the
radial axis.
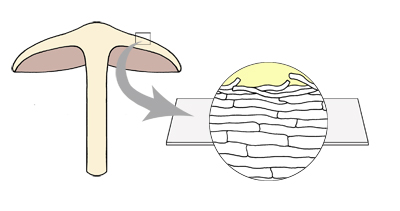
Radial cross-section of the pileus
surface showing pileipellis structure.
Orientate the section by looking for spores and particles of debris that
indicate the pileus surface (although in a very thick section, which includes
the upper part of lamellae, the hymenium, with spores, will be visible on the
other side of the section to the surface). The surface layer is the pileipellis
and below this is the pileus trama. A differentiated hypoderm can lie between
the pileipellis and the trama. If the section is too thick, it is likely to sit
so that you look at the top of the pileipellis, and not at the cross-section.
When sectioning the stipe, cut an elongated rectangle from the stipe
surface along the long axis of the stipe. This
piece can be cut in longitudinal section to observe the presence of
caulocystidia. In order to observe the stipe trama for sarcodimitic tissue,
prepare a cross-section of the stipe by cutting the stipe in half, and then
cutting thin sections at right angles to the long axis (like slicing carrot).
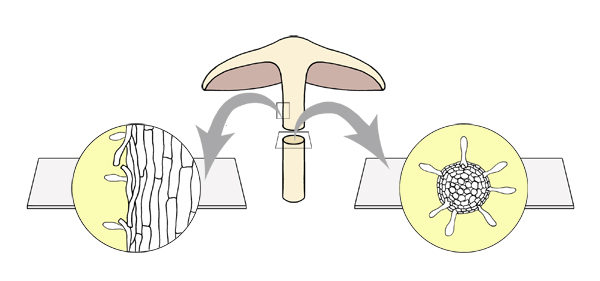
Cross-section and longitudinal
section of the stipe.
Another technique for sectioning lamellae, pileus or stipe is to immobilise
the piece of tissue being sectioned on a slide with clear nail varnish. Let the
nail varnish set, and then cut cross-sections.
After sectioning, the thin section will either adhere to the blade or to the
slide. If the former, tap the blade gently into a drop of mounting medium on a
slide, if the latter, forceps or a fine brush can be used to pick up the section
and transfer it to the drop of mounting medium. Use a small drop of mounting
medium so that the section stays under the cover slip when that is applied.
Sections can easily roll over from the intended view or become twisted. Place
the cover slip gently on the section so as not to squash it or tip it over.
Slight pressure on the cover slip can assist in removing air bubbles and
flattening sections, but care must be taken not to disrupt the original
orientation of hyphae until this has been established. To avoid twisted or
rolled over sections Young (1998b) suggests placing the section on a slide and
covering with a cover slip straight away. The orientation of the section can
then be checked under the dissecting microscope before adding mounting medium at
the edge of the cover slip.
Whether examining a piece of tissue or a section, once an initial inspection
of a slide has been made, gentle pressure can be applied to the cover slip. This
spreads out the tissue, which does mean that if a section is being examined, the
relative positions and arrangement of elements and hyphae is disrupted, but it
becomes easier to observe individual elements (such as basidia and any cystidia)
and hyphae (such as in the pileus trama). Pressure can be applied to the cover
slip by tapping with the eraser at the blunt end of a pencil. However, once
immersion oil has been applied, the best method is to use a needle or the tip of
forceps (but not very fine forceps, the tips of which readily break or
bend). The slide is inspected, the objective swung out, the cover slip tapped,
and the objective swung back. Inspect again to see if the elements and hyphae
are sufficiently spread out. Repeat until the elements and hyphae are clearly
visible. Mounting medium can be pushed out from under the cover slip and need to
be removed between tapping. Some experimentation is required to get the right
balance between moving the elements and hyphae apart sufficiently, and
pulverising the tissue.
For the pileus and stipe surface, a scalp or peel can yield
useful information.
A scalp section can be cut where the surface of the structure is curved, such
as in a convex pileus, or a cylindrical stipe. Cut more or less parallel to the
surface, using the curvature of the surface to end up with a very thin sliver of
tissue that includes the surface and some underlying context. For the pileus,
the scalp is very shallowly dome-shaped, thinner around the edges.
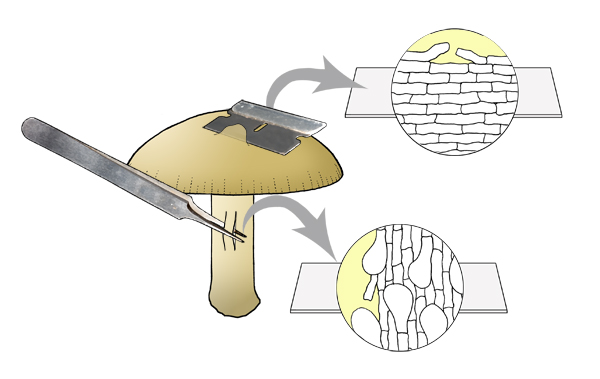
Scalp of pileus surface
and peel of stipe surface.
A peel is obtained with fine forceps. Push one tip of the forceps just below
the surface, then close the forceps and pull gently so that a strip of tissue
snaps off to one side of the tips of the forceps, and then peel off on the other
side a piece of the surface. If the peel remains connected at the other end to
that held by the forceps, use a razor blade to separate the other end from the
surface. When placing the peel in mounting medium, take care that the outer
surface is uppermost.
Simple preparations
There are several simple microscopic preparations that can yield useful
information on spores, basidia, cystidia and hyphae, without the need to cut
sections.
To examine lamellae structures, break off a small rectangular fragment
from the edge of a lamella with fine forceps. Make the fragment a little longer
than wide, and make the long axis more or less parallel with the edge of the
lamella (so that it is easy to locate the edge under the microscope). The edge
will be straighter than the opposite side of the fragment. The fragment only
needs to be a couple of millimetres long. Examine intact before applying any
pressure. If the specimen is mature, basidia with apical sterigmata will be
visible along with spores, some immature and still attached to basidia, and also
numerous free spores, which will readily drift off into the mounting medium. If
there are cheilocystidia, they will usually be quite apparent along the edge of
the lamella. Cheilocystidia differ from basidia and basidioles (immature
basidia) in their shape and/or size, and can have thickened walls or coloured
contents. There can be a continuous row of cheilocystidia, or they can be
mixed with basidia and basidioles. On the face of the lamella, the tops of
basidia can be seen, and any pleurocystidia are also visible. A small fragment
gouged from higher on the lamella can be observed to confirm the presence of
pleurocystidia.
For the pileus surface a peel or scalp will indicate of the presence
of pileocystidia and can assist in the interpretation of the pileipellis structure
(although a radial cross-section is desirable for this also).
For the stipe surface, the peel is along the long axis of the stipe,
and will indicate the presence of caulocystidia.
Spores on lamellae are a mixture of immature and mature. Mature spores can be
examined from a spore print, or from stipe or pileus scalps or peels or from the
upper surface of an annulus (where present). Spores on the stipe have fallen
from the lamellae, those on the pileus drift there through air currents, or are
deposited from nearby fruit-bodies (such as in a caespitose cluster).
Hyphae and spores of different genera are differently coloured in some stains
and reagents, the most important of which is Melzer's Reagent (containing
iodine). When assessing any colour changes in spores or hyphae it is important to compare the colour
in water mounts with that caused by the application of reagent. Water can
be used to examine fragments of tissue or sections, but hyphae are often
hyaline, and easier to visualise when stained, such as by Congo Red, which is a
good general-purpose mounting medium.
When using chemicals, always follow instructions about safe use and consult Safety Data Sheets for hazardous chemicals.
Potassium Hydroxide (KOH) solution
- KOH 3 g
- Water 97 ml
Use a relatively weak solution (3-5%) for rehydrating tissue of dried
specimens, and as a mounting agent for fresh material. A weak KOH solution can
also be used to detect microchemical reactions such as for chrysocystidia or the
pileus trama hyphae. A stronger solution (10-15%) is applied to the pileus or
stipe surface to induce macrochemical reactions (colour changes).
Melzer's Reagent
- Potassium Iodide 1.5 g
- Iodine 0.5 g
- Water 20.0 g
- Chloral hydrate 22.0 g
An essential stain for studying spores of fungi, and also useful for some
tissues. There might be no reaction, an amyloid (blue-black) or a
dextrinoid (reddish brown) reaction. In addition to the different colour
reactions in Melzer's Reagent, spore ornamentation of hyaline spores can be more
readily visible due to the optical properties of the reagent.
Congo Red
Make up 1% solution of Congo Red dye in water and add a drop of this solution to material mounted in 3% KOH.
This is a good general purpose stain for studying fungal tissues. The stain
is taken up by the walls of hyphae and spores.
A compound microscope is essential for viewing microcharacters. Binocular
rather than monocular microscopes are more comfortable to use. Low power
objectives are employed to position the specimen being viewed, and these do not need
to be of highest quality. A ×100 (oil immersion) objective is ideal, but most
structures can be seen with a reasonable quality ×40 objective. However, fine
detail of spore ornamentation might not be visible with the ×40 objective. Normal
bright field illumination is suitable for viewing all the characters used in
FunKey. Phase contrast or differential interference contrast objectives provides
extra detail, particularly of spore ornamentation, and they can also make tissue
structure easier to visualise.
Advice and experience with suitable microscopes can be sought from field
naturalists clubs, which sometimes have microscopical groups, or fungal studies
groups. A list of contacts for such groups is provided in the Fungimap
Newsletter.
Observe tissue fragments or sections at low power to locate them in the field
of view. Once material is centred, higher magnification objectives can be swung
into place. With the ×40 objective the overall structure of tissues, such as the orientation of the lamellar trama or the type of pileipellis, can be
observed, as can many details of cystidia and spore shape and ornamentation.
If making measurement with the ×40 objective, the eyepiece scale will usually
be equivalent to about 2.5 micrometres for each division, so for smaller structures such
as spores less than 10 micrometres long, measure at least to half a division of the scale
so that the measurements are accurate to about the nearest micrometre.
If using a ×100 objective, observe first with the ×40 objective to orientate the
tissue (such as locating the edge of a lamellar fragment, or the surface of a
pileipellis cross-section), then swing out the ×40 objective, add a small drop
of immersion oil, and swing in the ×100 objective. If the material is focussed
with the ×40 objective, it should be in focus with the ×100 objective. If not,
use only the fine focus to slightly move the objective up or down until in
focus. Be very careful not to drive the objective into the cover slip. If in
doubt, look at the objective side-on while focussing, and lower the objective
until the smallest of gaps is apparent between cover slip and objective, and
then looking through the eyepieces, use the fine focus to raise the objective
until the material is in focus.
When using oil immersion, use as little oil as possible. Be very careful not
to get oil on the other objectives. Once oil has been added to the cover slip,
do not move from the ×100 to the ×40 objective, otherwise oil may get on to the
×40 objective, and then must be removed with lens cleaning fluid.
Correct set up of the lighting and alignment of the microscope is essential.
Light is controlled by a basal diaphragm (the field diaphragm), and there is a
sub-stage condenser which has its own diaphragm. The sub-stage condenser can be
lowered or raised and also moved from side to side. Manipulation of the position
of the sub-stage condenser and the amount of closure of the diaphragms makes a
big difference to the clarity of the field of view. Koehler illumination is a
method for set up of the microscope according to the following steps: (1) turn
on light source, (2) close down the field diaphragm, (3) move the sub-stage
condenser up or down so that the edge of the diaphragm is in sharp focus. At
this point, the sub-stage condenser may need to be centred (there are two adjustment screws) so that the circle of light is in the centre of the field of
view, (4) open the field diaphragm so that it is just outside of the field of
view, (5) adjust the sub-stage diaphragm so that when the field of view is
observed by taking out one of the eyepieces, the circle of light is about two-thirds to three-quarters of the area of the field of view. Follow these steps
for optimum set up; however, moving the condenser or the sub-stage diaphragm
from these optimal positions can sometimes enhance details, so experiment! The
intensity of the light source should also be adjusted to provide sufficient
illumination that does not strain the eyes.
Summary points for examination of microcharacters
- Use as small a piece of tissue as possible;
- For dried material, rehydrate in KOH;
- Squashing (but not pulverising) tissue is a valuable technique for initial examination;
- For tissue structure, peels and scalps can provide useful information, but sections are best;
- Stains can be useful for hyphae walls and spore ornamentation;
- High quality ×100 objectives give high quality images; and
- Correct set up of lighting of the microscope is essential.
Bougher, N.L. & Syme, K. (1997). Fungi of Southern Australia.
University of Western Australia Press, Nedlands. [Chapters on 'Finding,
collecting and processing fungi' and 'Describing fungi'.]
Cleménçon, H. (2004), Cytology and Plectology of the Hymenomycetes. Bibliotheca Mycologica Volume 199. J. Cramer, Berlin. [Copiously illustrated work on microscopic structures of agarics and other Hymenomycetes.]
Largent, D.L. (1986), How to Identify Mushrooms to Genus I: Macroscopic
Features, revised edn. Mad River Press: Eureka. [Comprehensive illustrated
account of terminology and techniques for macrostructure.]
Largent, D., Johnson, D. & Watling, R. (1977), How to Identify Mushrooms
to Genus III: Microscopic Features. Mad River Press: Eureka. [Comprehensive
illustrated account of terminology and techniques for microstructure.]
Singer, R. (1986), The Agaricales in Modern Taxonomy, 4th edn. Koeltz
Scientific Books, Koenigstein. [Advanced text with extensive introduction on
macro- and micromorphology, and some illustrations.]
Vellinga, E.C. (1988), Glossary, in C. Bas, T.W. Kuyper, M.E.
Noordeloos & E.C. Vellinga (eds), Flora Agaricina Neerlandica, Vol. 1,
54-64. A.A. Balkema, Rotterdam. [Useful illustrated glossary.]
Young, T. (1998b), Some practical suggestions for fungal studies,
Australas. Mycol. Newsl. 17: 83–86.
Colour charts
Kornerup, A. & Wanscher, J.H. (1978), Methuen Handbook of Colour, 3rd edn. Methuen, London.
Rayner, R.W. (1970), A Mycological Colour Chart. Commonwealth Mycological Institute, Kew and British Mycological Society.
Royal Botanic Gardens Edinburgh (1969), Flora of British Fungi Colour Identification Chart. Her Majesty's Stationery Office, Edinburgh.
top of page